In Part 1, I covered how changing your DNS settings to AdGuard's public servers blocks most ads with zero effort. That works great for most people.
But what if you want to see exactly what's being blocked? What if you want different rules for your kids' devices? What if you want to know which of your smart home gadgets are phoning home to servers in countries you've never heard of?
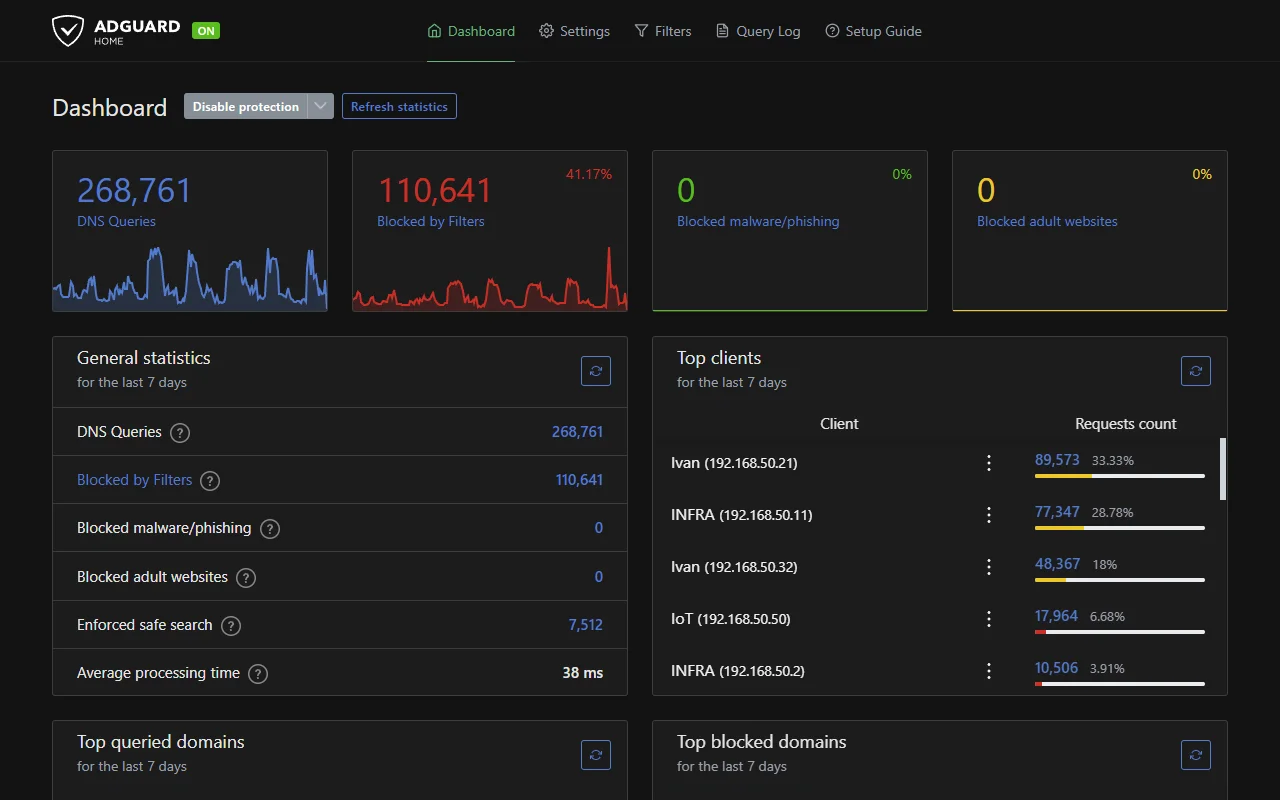
That's where AdGuard Home comes in. It's a DNS server you run yourself, on your own network, with a dashboard that shows you everything.
What You Get That Public DNS Does Not Offer
Running your own DNS server sounds like overkill until you see what it reveals:
Complete Visibility
Every DNS query from every device shows up in your logs. You will discover:
- Which apps are making requests in the background
- How often your smart TV phones home (spoiler: constantly)
- Whether that "free" app is worth the tracking it does
- What your IoT devices are really up to
What if your smart doorbell or security camera is making requests to servers in three different countries every few minutes? With AdGuard Home, you would see it. The devices might not be doing anything malicious, but seeing it in black and white changes how you think about what you bring into your home.
Per-Device Control
Want to block social media on your kids' devices but not yours? Want stricter filtering on the family TV? AdGuard Home lets you set different rules for different devices.
The Client Settings feature lets you:
- Name each device (so you see "Kids iPad" instead of a random IP)
- Apply different filtering rules per device or group
- Set custom upstream DNS servers for specific clients
- Block or allow specific services per device
Parental Controls
Beyond ad blocking, AdGuard Home includes parental control features:
- Safe Search: Forces safe search on Google, Bing, YouTube, and other search engines
- Adult Content Blocking: Block adult websites using curated blocklists
- Time-based Rules: Schedule when filtering is active (stricter during homework hours, for example)
- Per-device Policies: Different rules for different family members
Custom Block Lists
The default filtering is good, but you can add specialized lists:
- Gaming ad blockers
- Smart TV specific trackers
- Regional ad networks
- Malware and phishing lists
Or create your own rules. Maybe you want to block a specific domain that keeps bothering you.
Blocked Services
Sometimes you do not want to block ads on a service, you want to block the entire service. AdGuard Home has a Blocked Services feature that lets you disable access to specific platforms with one click:
- Social media (TikTok, Facebook, Instagram, Snapchat, Twitter)
- Gaming platforms (Steam, Epic Games, Discord)
- Streaming services (Netflix, Twitch, YouTube)
- Messaging apps (WhatsApp, Telegram, Messenger)
- And dozens more
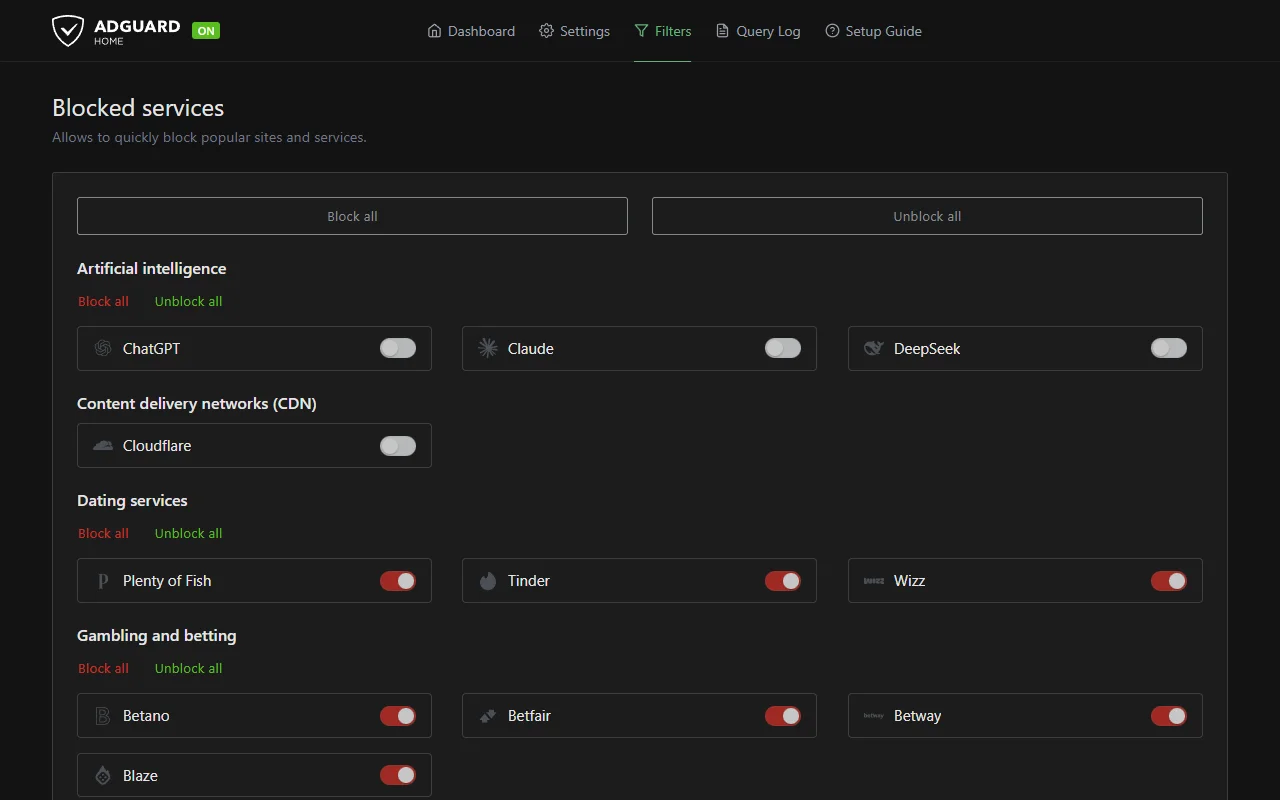
This is especially useful for parental controls or maintaining focus. Instead of hunting down every domain TikTok uses, just flip one switch.
Statistics That Matter
The dashboard shows you:
- Total queries (you will be surprised how many)
- Percentage blocked
- Top queried domains
- Top blocked domains
- Which devices are the chattiest
Typical home networks see thousands of DNS queries per hour. Blocking rates of 15-30% are common, and that's with normal browsing.
What You Need
AdGuard Home runs on almost anything:
- Raspberry Pi (most common): around $50-70 for a Pi 4
- Old laptop or PC: that dusty machine in the closet works fine
- NAS device: Synology, QNAP, etc. often support Docker
- Cloud server: for remote access (but you lose some privacy benefits)
- Some routers: OpenWrt, pfSense, OPNsense can run it directly
Hardware Requirements
The official minimum is modest: 1GHz CPU, 512MB RAM, 100MB disk space. But real-world usage depends on how many filter lists you enable.
| Usage Level | RAM Recommended | Notes |
|---|---|---|
| Light (few devices, default lists) | 512MB | Fine for basic setup |
| Medium (household, multiple filter lists) | 1-2GB | Recommended for most homes |
| Heavy (large blocklists, many clients, encrypted DNS) | 2-4GB | For power users |
⚠️ Start small with filter lists. Each list you add increases memory usage, especially during filter updates. On memory-constrained devices (routers, older Pis), adding too many lists at once can cause AdGuard Home to crash or become unresponsive. Start with the default AdGuard filter, run it for a few days, then gradually add more lists if needed. Using a swap file is recommended for devices with limited RAM.
A Raspberry Pi 4 with 2GB+ RAM handles most home setups comfortably. The Pi is overkill for basic filtering, but gives you headroom for growth.
The Setup Overview
I am not going to give you a full terminal-by-terminal tutorial here (the official docs do that well), but here is what the process looks like:
Option 1: Check Your Router First (Easiest)
Before installing anything, check what your router already supports. There are two levels:
AdGuard DNS support (most common):
Many routers now have one-click configuration for AdGuard DNS: the public DNS service from Part 1. This is not the same as running AdGuard Home, but it gets you ad blocking without any extra hardware:
- ASUS routers: Built-in AdGuard DNS option in the firmware
- Many modern routers: Check your DNS settings for preset options

If you just want ads blocked and do not need the full dashboard or per-device control, this might be enough. AdGuard DNS has a free tier that covers most home use cases.
AdGuard Home support (less common):
Some routers can actually run AdGuard Home itself, giving you the full dashboard and all features:
- Keenetic routers: Built-in AdGuard Home support
- GL.iNet routers: Available as a plugin
- OpenWrt/DD-WRT: Can be installed as a package
Google your router model + "AdGuard Home" to see if it is supported. If it is, you skip all the hardware setup entirely.
Option 2: Docker (Recommended for Most)
If you have any machine running Docker, this is the cleanest approach:
docker run -d
  --name adguardhome
  --restart unless-stopped
  -p 53:53/tcp -p 53:53/udp
  -p 3000:3000/tcp
  -v /path/to/data:/opt/adguardhome/work
  -v /path/to/config:/opt/adguardhome/conf
  adguard/adguardhome
Then open http://your-server-ip:3000 and follow the setup wizard.
Option 3: Direct Install (Raspberry Pi / Linux)
For a dedicated device like a Pi:
curl -s -S -L https://raw.githubusercontent.com/AdguardTeam/AdGuardHome/master/scripts/install.sh | sh -s -- -vThis installs AdGuard Home as a system service that starts automatically on boot.
Option 4: Proxmox / VM
If you are running a home lab with Proxmox, there are helper scripts that make this trivially easy. The Proxmox VE Helper Scripts project has a one-liner that creates a minimal container with AdGuard Home pre-installed.
Connecting Your Network
This is the part that trips people up. You have AdGuard Home running. Now what?
The Goal
Every device on your network needs to use your new DNS server instead of whatever they are currently using (probably your router, which forwards to your ISP).
Two Approaches
Change it on your router (recommended):
- Log into your router
- Find DHCP settings
- Set the DNS server to your AdGuard Home IP address
- Save and restart
Now every device that connects to your network automatically gets told to use AdGuard Home for DNS. Phones, tablets, TVs, game consoles, smart speakers, everything.
Change it on individual devices:
Same process as Part 1, but instead of the public AdGuard DNS addresses, use your AdGuard Home server's IP address.
Your router is typically something like 192.168.1.1 or 192.168.0.1. Your AdGuard Home server will have a different IP on the same network: for example 192.168.1.50 if you are running it on a Raspberry Pi. You will see this IP in the AdGuard Home setup wizard.
One Important Step: Static IP
Your AdGuard Home server needs a stable IP address. If it changes, suddenly nothing on your network can resolve DNS.
Either:
- Set a DHCP reservation in your router (gives the same IP to the same device every time)
- Configure a static IP directly on the server
Both work. The router reservation is usually easier.
Configuring AdGuard Home
Once it is running and your network is using it, the fun begins.
DNS Settings
By default, AdGuard Home forwards requests it cannot block to upstream DNS servers. The defaults are fine, but you might want to use:
- Cloudflare (
1.1.1.1): fast, privacy-focused - Quad9 (
9.9.9.9): includes malware blocking - Google (
8.8.8.8): reliable, but Google
For extra privacy, use DoH upstreams. AdGuard Home supports this out of the box.
Block Lists
The default AdGuard filter blocks already a lot, but you can add more:
- OISD: comprehensive, well-maintained
- Steven Black Hosts: classic unified hosts list
- EasyList: the standard for browser ad blocking
- Regional lists: for country-specific ads
⚠️ Don't go overboard. More lists mean more memory usage and more potential for false positives where legitimate sites get blocked. The default AdGuard filter plus one or two specialized lists is plenty for most people. If you're running on limited hardware (router, older Pi), stick with fewer lists.
Dealing with Breakage
Sometimes blocking goes too far. A site will not load, a login does not work, something breaks.
The Query Log is your friend here. When something breaks:
- Check the Query Log for recently blocked domains
- Look for anything related to the broken site
- Add it to your Allowlist
- Refresh the page
Common things people need to allow:
- Some CDN domains
- Payment processors
- Login/authentication services
- Specific app requirements
AdGuard Home makes this easy to debug. Public DNS filtering is more of a black box.
What About When You Are Not Home?
This is the one downside of self-hosted DNS: it only works on your home network.
Yes, technically you can set up a VPN to tunnel back home, or run AdGuard Home on a cloud server. But that adds complexity and is beyond the scope of this guide.
The practical solution? Use AdGuard DNS (Part 1) when you are away from home. It takes 2 minutes to configure on your phone and gives you the same ad-blocking protection on any network.
Most people run AdGuard Home at home for the visibility and control, then fall back to public AdGuard DNS when traveling. Best of both worlds.
Is This Worth the Effort?
For me? Absolutely. The visibility alone is worth it. Seeing exactly what every device is doing changed how I think about my network.
For you? Depends on how you answer these questions:
- Are you tired of seeing ads everywhere, even on devices where you cannot install an ad blocker?
- Do you worry about what data your smart devices are sending and to whom?
- Do you want different filtering rules for your kids' devices?
- Are you curious what your IoT gadgets are really doing on your network?
- Do you want faster page loads and less wasted bandwidth? (Blocked requests never even start downloading, and local DNS caching means repeated lookups are instant.)
If you answered yes to any of those, give it a shot. The setup takes an afternoon, and you can always go back to public DNS if it is not for you.
If you just want ads blocked with zero maintenance, stick with Part 1. The public DNS approach handles 90% of what most people need.
AdGuard Home vs AdGuard DNS vs Pi-hole
Choosing between self-hosted and cloud DNS filtering? Here's how the three main options compare.
| Feature | AdGuard Home | AdGuard DNS | Pi-hole |
|---|---|---|---|
| Setup complexity | Medium (30-60 min) | Easy (5 min) | Medium (30-60 min) |
| Hardware needed | Raspberry Pi or server | None | Raspberry Pi or server |
| Custom filter rules | Unlimited, regex support | Limited (100 on free) | Unlimited, regex support |
| HTTPS filtering | Yes (with certificate) | No | No |
| Parental controls | Built-in, per-device | Basic (paid plans) | Manual blocklists only |
| Query logging | Full, searchable | Basic stats | Full, searchable |
| UI / Dashboard | Modern web interface | Cloud dashboard | Web interface |
| Encrypted DNS | DoH, DoT, DoQ, DNSCrypt | DoH, DoT | DoH (with add-on) |
| Best for | Power users, families | Anyone, zero maintenance | Linux enthusiasts |
AdGuard Home and Pi-hole offer similar self-hosted capabilities, but AdGuard Home has a more polished UI and built-in encrypted DNS support out of the box. Pi-hole has a larger community and more third-party integrations. AdGuard DNS is the no-maintenance option for people who just want ads gone.
Resources
- AdGuard Home Official Documentation
- AdGuard Home GitHub
- Pi-hole: similar alternative if you want to compare
- Proxmox Helper Scripts: for easy container deployment
Get Personalized Help
Copy this prompt to ChatGPT, Claude, or your favorite AI assistant. Fill in your details and get guidance tailored to your specific situation.
I want to set up AdGuard Home on my own network after reading the guide at https://ivanmisic.net/blog/tech/adguard-home-network-wide-ad-blocking

My setup:
- Hardware I plan to run it on: [WHAT YOU HAVE - e.g., Raspberry Pi 4, Synology NAS, old laptop, Proxmox server, GL.iNet router, or "not sure what to buy yet"]
- Router model: [YOUR ROUTER - e.g., ASUS RT-AX86U, Netgear Nighthawk, ISP-provided modem, mesh system like Eero/Google Wifi]
- Technical comfort: [BEGINNER - never used terminal / INTERMEDIATE - comfortable with basic commands / ADVANCED - run a home lab]
- Main goal: [WHAT MATTERS MOST - e.g., block ads on all devices, monitor smart home traffic, set up parental controls, replace Pi-hole, full network visibility]

Where I need help:
- Choosing the best installation method for my hardware (Docker vs direct install vs router plugin)
- Connecting my network to use AdGuard Home as DNS (router DHCP settings vs per-device)
- Which block lists to start with for my use case

Walk me through the setup for my specific hardware and network. If there are gotchas with my router or platform, warn me upfront.